
oikiture bed frame assembly instructions
Assembly of the Oikiture bed frame requires careful attention to detail and adherence to provided instructions. Proper assembly ensures stability, safety, and optimal functionality of the bed frame.
1.1 Overview of the Oikiture Bed Frame
The Oikiture bed frame is a modern, versatile furniture piece designed for durability and aesthetic appeal. It features a sleek design with sturdy construction, offering ample support and comfort. The frame is typically made from high-quality materials, ensuring long-lasting performance. Its modular design allows for easy customization to fit various bedroom styles. With a focus on functionality, the Oikiture bed frame often includes features like storage options or adjustable settings, making it a practical choice for homeowners seeking both style and utility.
1.2 Importance of Proper Assembly

Proper assembly of the Oikiture bed frame is crucial for ensuring stability, safety, and optimal functionality. Incorrect assembly can lead to structural issues, such as wobbling or creaking, which compromise the bed’s durability; Following the instructions carefully helps prevent damage to components and ensures all features, like storage boxes or adjustable settings, work as intended. Proper assembly also enhances safety, preventing potential hazards like collapsing parts. It guarantees a sturdy and comfortable sleeping environment, making the effort worthwhile for long-term satisfaction.
Tools and Materials Required
To assemble the Oikiture bed frame, you’ll need a screwdriver, Allen wrench, and rubber mallet. Required materials include frame parts, screws, bolts, slats, and storage boxes.
2.1 Essential Tools for Assembly
The assembly process requires specific tools to ensure accuracy and efficiency. A screwdriver, preferably a cordless drill, is essential for driving screws. An Allen wrench is needed for securing bolts and fittings. A rubber mallet can help tighten parts without causing damage. Additionally, a tape measure and clamps may be useful for alignment and stability during assembly. Having these tools readily available will streamline the process and minimize potential delays or issues.
2.2 Materials Needed for the Project
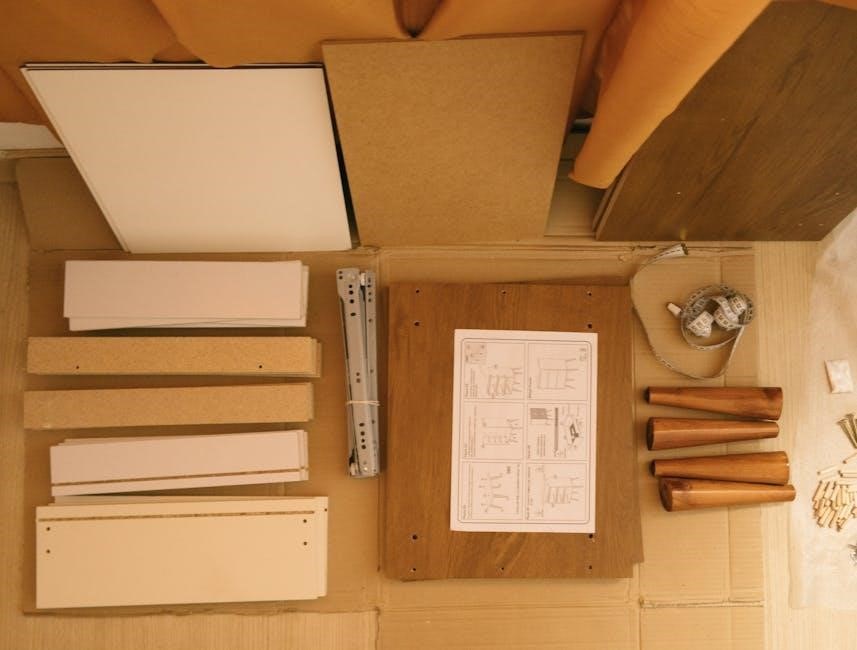
The assembly requires all components provided with the Oikiture bed frame, including the frame itself, support slats, headboard, and storage boxes if applicable. Essential hardware includes screws, bolts, and dowels. Ensure all parts are accounted for before starting. Additional materials like a rubber mallet or wood glue may be useful but are not always necessary. Refer to the instruction manual for a comprehensive list of included items to avoid missing any critical components during assembly.
Step-by-Step Assembly Guide
Assembling the Oikiture bed frame involves unpacking, preparing components, and following a systematic approach. Start by assembling the base, then attach the headboard, add support slats, and ensure all parts are securely tightened. Follow the provided instructions carefully to achieve a sturdy and stable bed frame.
3.1 Preparing the Components
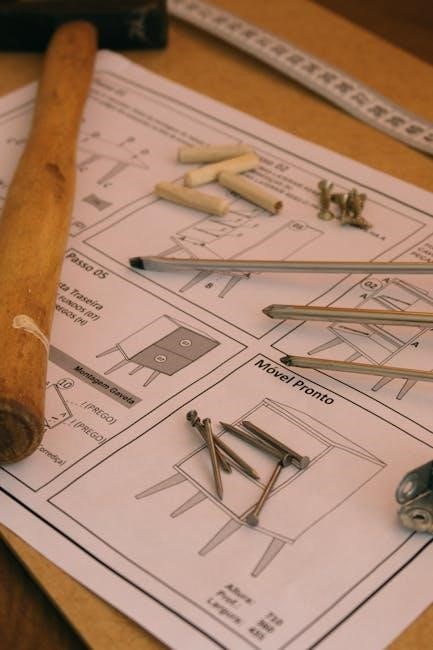
Before assembling the Oikiture bed frame, unpack and organize all components. Verify each part against the inventory list to ensure nothing is missing. Separate hardware like screws, bolts, and Allen keys. Clean the workspace and lay out components for easy access. Double-check all instructions and diagrams to understand the assembly sequence. Proper preparation ensures a smooth and efficient assembly process without delays or errors.
3.2 Assembling the Bed Frame
Begin by attaching the side rails to the bed frame using the provided screws and Allen key. Ensure all connections are secure and properly aligned. Next, attach the support legs to the frame for stability. Use the Allen key to tighten firmly but avoid over-tightening. Once the frame is assembled, ensure it is level to prevent wobbling. Finally, attach the center support beam if required, following the manual’s torque specifications for a sturdy structure.
3.3 Attaching the Headboard
To attach the headboard, align it with the bed frame’s mounting points. Secure it using the provided bolts or screws. Tighten firmly but avoid overtightening. Ensure proper alignment for stability and appearance. Double-check all connections for security and adjust if necessary. This step is crucial for both aesthetics and structural integrity.
3.4 Installing Support Slats
Begin by unpacking and organizing the support slats. Align each slat evenly across the bed frame, ensuring proper spacing as indicated in the instructions. Secure the slats using the provided screws or clips. Tighten firmly to avoid movement. Check the slats for levelness and stability. Ensure all slats are evenly distributed to support the mattress adequately. Proper installation of slats is essential for preventing sagging and ensuring long-term durability of the bed frame.
3.5 Adding Storage Boxes
Unpack and prepare the storage boxes, ensuring all components are included. Position each box under the bed frame, aligning the pre-drilled holes with the frame’s mounting points. Secure the boxes using the provided screws or brackets. Tighten firmly to ensure stability. Double-check the alignment and ensure boxes are evenly spaced. Proper installation ensures the storage boxes are functional and do not interfere with the bed’s stability. Test by gently pulling on the boxes to confirm they are securely attached.
Common Mistakes to Avoid
Common mistakes include incorrect alignment of parts, missing or extra hardware, over-tightening screws, and improper slat installation. These errors can lead to instability or damage.
4.1 Incorrect Alignment of Parts
Incorrect alignment of parts is a common issue during assembly, leading to structural instability. Misaligned components can cause uneven surfaces, wobbling, or even collapse. To avoid this, always use a spirit level to ensure frames and supports are properly aligned. Double-check the orientation of each part against the manual before securing it with screws or bolts. Proper alignment ensures the bed frame is stable and functions as intended, preventing potential safety hazards. Pay extra attention to symmetrical elements like side rails and headboard attachments.
4.2 Missing or Extra Hardware
Missing or extra hardware can significantly delay assembly or compromise the bed frame’s integrity. Always verify the hardware kit against the manual’s inventory list before starting. If items are missing, contact customer support promptly. Similarly, having extra parts may indicate a packing error or misassembly. Ensure each screw, bolt, and connector is used as specified to avoid structural weaknesses. Proper hardware management ensures a secure and stable bed frame, preventing potential safety issues or disassembly difficulties later on.
4.3 Over-Tightening Screws
Over-tightening screws is a common mistake that can damage the bed frame’s material or strip screw holes. It may lead to structural weaknesses and instability. Always use the recommended torque as specified in the instructions. If unsure, tighten screws firmly but avoid excessive force. Check each joint for proper alignment before final tightening to ensure a secure and even fit. This prevents warping or cracking, especially in wood or particleboard components, and ensures long-term durability of the bed frame.
4.4 Improper Slat Installation
Improper slat installation can lead to an unstable bed frame and may cause structural damage over time. Ensure slats are evenly spaced and aligned with pre-drilled holes; Use the correct screws provided, as larger or mismatched hardware can strip the material. Avoid overtightening slat screws, as this can warp the frame. Always refer to the manual for specific slat placement and torque recommendations. Proper installation ensures even weight distribution and prevents creaking or sagging, enhancing the bed’s durability and safety.
Disassembly Tips
Disassembling the Oikiture bed frame requires careful removal of storage boxes and reversing assembly steps. Handle hardware safely to avoid damage or loss. Plan ahead for reassembly.
5.1 Removing Storage Boxes
Begin by clearing the storage boxes of any contents. Remove screws or bolts securing them to the frame using an Allen wrench. Gently lift each box, ensuring no connectors or brackets remain attached. Set aside hardware safely; Clean the area for easier reassembly later. Handle with care to avoid damage to the boxes or frame. This step ensures smooth disassembly and prevents potential damage during the process. Store boxes securely to maintain their condition.
5.2 Disassembling the Frame
Begin by removing all bedding and accessories. Use an Allen wrench to detach side rails from the headboard and footboard. Carefully lift and separate the frame components. Remove bolts connecting the legs to the base. Store hardware in a labeled container to avoid loss. Handle each part with care to prevent scratching or damage. Ensure the floor is clear to safely maneuver sections. Disassembling systematically helps maintain the integrity of the frame for future reassembly. Avoid forcing parts, as this may cause breakage or misalignment. Always follow the manufacturer’s guidelines for proper disassembly techniques to ensure safety and preserve the product’s condition. If unsure, consult the provided instructions or seek professional assistance. Proper disassembly is crucial for transporting or storing the bed frame without causing permanent damage. This step is essential for maintaining the structural integrity of the bed frame and ensuring all components remain usable. By carefully disassembling each part, you can easily reassemble the bed frame when needed. Always prioritize safety and organization during the disassembly process to avoid accidents or missing hardware. Keep track of all screws, bolts, and smaller parts to ensure a smooth reassembly process. If you encounter resistance or difficulty, double-check the instructions or look for hidden connectors that may still be securing the frame. Patience and attention to detail are key to successfully disassembling the bed frame without causing damage. Proper handling and storage of disassembled parts will extend the lifespan of your bed frame and ensure it remains functional for years to come. Disassembling the frame is a straightforward process when done methodically and with the right tools. Always consider enlisting a second person for assistance, especially with larger or heavier components. By following these steps, you can efficiently disassemble the bed frame while maintaining its quality and structural integrity. This process is a crucial part of maintaining or relocating your bed frame, ensuring it remains stable and secure after reassembly. Remember to inspect each part for damage or wear during disassembly, addressing any issues before reassembling. Properly disassembling the frame also allows for easy transportation, making it convenient to move or store as needed. Take your time and work through each step carefully to ensure a successful disassembly. This will save you time and effort in the long run by preventing potential problems during reassembly. Always refer back to the assembly instructions for guidance on disassembling specific parts of the frame. By doing so, you can ensure that each component is removed correctly and safely. Disassembling the bed frame is a manageable task when approached systematically and with attention to detail. Keep all hardware organized and within reach to streamline the process. Avoid using excessive force, as this can damage the frame or strip screws, making reassembly more challenging. If you encounter any difficulties, consult the user manual or seek advice from a professional to resolve the issue effectively. Remember, proper disassembly is essential for maintaining the bed frame’s quality and functionality. Handle each part with care, and store them securely to ensure they remain in good condition. This step is vital for the longevity and usability of your bed frame, allowing you to enjoy it for years to come. By following these guidelines, you can successfully disassemble the bed frame without compromising its structural integrity. Always prioritize organization and safety throughout the process to achieve the best results. Disassembling the frame is a simple yet important task that requires attention to detail and careful handling. Take the time to ensure each step is executed correctly to maintain the quality of your bed frame. Proper disassembly not only preserves the frame but also makes future assembly easier and more efficient. Keep all components clean and dry during storage to prevent rust or damage. By adhering to these instructions, you can confidently disassemble the bed frame and prepare it for transportation or storage. Remember to label and store hardware separately to avoid misplacement. This organized approach will make reassembly quicker and less stressful. Disassembling the bed frame is a straightforward process when done correctly, ensuring that all parts remain in excellent condition for future use. Always refer to the manufacturer’s instructions for specific guidance on disassembling your particular bed frame model. By doing so, you can ensure a safe and effective disassembly process that maintains the integrity of your furniture. Proper disassembly techniques are essential for preserving the bed frame’s quality and ensuring it remains a durable and comfortable piece of furniture for years to come. Handle each component with care, and store them securely to maintain their condition. This step is crucial for the longevity and functionality of your bed frame, allowing you to enjoy it without compromise. By following these steps, you can successfully disassemble the bed frame while maintaining its structural integrity and ensuring all parts remain usable. Always prioritize organization and safety throughout the process to achieve the best possible outcome. Disassembling the bed frame is a manageable task that requires attention to detail and careful handling. Take the time to ensure each step is executed correctly to maintain the quality of your bed frame. Proper disassembly not only preserves the frame but also makes future assembly easier and more efficient. Keep all components clean and dry during storage to prevent rust or damage. By adhering to these instructions, you can confidently disassemble the bed frame and prepare it for transportation or storage. Remember to label and store hardware separately to avoid misplacement. This organized approach will make reassembly quicker and less stressful. Disassembling the bed frame is a straightforward process when done correctly, ensuring that all parts remain in excellent condition for future use. Always refer to the manufacturer’s instructions for specific guidance on disassembling your particular bed frame model. By doing so, you can ensure a safe and effective disassembly process that maintains the integrity of your furniture. Proper disassembly techniques are essential for preserving the bed frame’s quality and ensuring it remains a durable and comfortable piece of furniture for years to come. Handle each component with care, and store them securely to maintain their condition. This step is crucial for the longevity and functionality of your bed frame, allowing you to enjoy it without compromise. By following these steps, you can successfully disassemble the bed frame while maintaining its structural integrity and ensuring all parts remain usable. Always prioritize organization and safety throughout the process to achieve the best possible outcome. Disassembling the bed frame is a manageable task that requires attention to detail and careful handling. Take the time to ensure each step is executed correctly to maintain the quality of your bed frame. Proper disassembly not only preserves the frame but also makes future assembly easier and more efficient. Keep all components clean and dry during storage to prevent rust or damage. By adhering to these instructions, you can confidently disassemble the bed frame and prepare it for transportation or storage. Remember to label and store hardware separately to avoid misplacement. This organized approach will make reassembly quicker and less stressful. Disassembling the bed frame is a straightforward process when done correctly, ensuring that all parts remain in excellent condition for future use. Always refer to the manufacturer’s instructions for specific guidance on disassembling your particular bed frame model. By doing so, you can ensure a safe and effective disassembly process that maintains the integrity of your furniture. Proper disassembly techniques are essential for preserving the bed frame’s quality and ensuring it remains a durable and comfortable piece of furniture for years to come. Handle each component with care, and store them securely to maintain their condition. This step is crucial for the longevity and functionality of your bed frame, allowing you to enjoy it without compromise. By following these steps, you can successfully disassemble the bed frame while maintaining its structural integrity and ensuring all parts remain usable. Always prioritize organization and safety throughout the process to achieve the best possible outcome. Disassembling the bed frame is a manageable task that requires attention to detail and careful handling. Take the time to ensure each step is executed correctly to maintain the quality of your bed frame. Proper disassembly not only preserves the frame but also makes future assembly easier and more efficient. Keep all components clean and dry during storage to prevent rust or damage. By adhering to these instructions, you can confidently disassemble the bed frame and prepare it for transportation or storage. Remember to label and store hardware separately to avoid misplacement. This organized approach will make reassembly quicker and less stressful. Disassembling the bed frame is a straightforward process when done correctly, ensuring that all parts remain in excellent condition for future use. Always refer to the manufacturer’s instructions for specific guidance on disassembling your particular bed frame model. By doing so, you can ensure a safe and effective disassembly process that maintains the integrity of your furniture. Proper disassembly techniques are essential for preserving the bed frame’s quality and ensuring it remains a durable and comfortable piece of furniture for years to come. Handle each component with care, and store them securely to maintain their condition. This step is crucial for the longevity and functionality of your bed frame
5.3 Handling Hardware Safely

Handling hardware safely during disassembly is crucial to prevent damage and injury. Begin by gathering appropriate tools, such as an Allen wrench, and a container for storing screws and bolts. Ensure the tool fits correctly to avoid stripping screws. Remove screws slowly and place them on a soft cloth to prevent loss or damage. Work in a clear, organized space to maintain control of all parts. Label components as you remove them for easy reassembly. Avoid excessive force, which can bend metal or crack wood. If a screw is stubborn, consider using a rubber mallet to gently loosen it. Store hardware in labeled bags to prevent confusion. Keep the frame in a dry place to avoid rust or warping. Follow manufacturer instructions for specific guidance, and consult tutorials if unsure. Clean hands before handling hardware to maintain part condition. By being meticulous and patient, you can safely handle hardware and preserve the bed frame for future use.

Troubleshooting Common Issues
Common issues include wobbling, creaking, or slat damage. Check alignment, tighten screws, and ensure slats are secure. Address hardware problems promptly to maintain stability.
6.1 Wobbling or Instability
Wobbling or instability in the Oikiture bed frame often results from improper assembly or uneven surfaces. Ensure all bolts and screws are tightly secured and evenly tightened. Check for missing or loose hardware, as this can compromise the frame’s stability. If the floor is uneven, consider using adjustable feet or placing the frame on a level surface. Regularly inspect the frame for any damage or wear that might contribute to instability.
6.2 Creaking Noises
Creaking noises in the Oikiture bed frame can result from loose bolts, uneven surfaces, or improper assembly. To address this, ensure all hardware is tightly secured and evenly tightened. If the issue persists, check for gaps between components and tighten any loose connections. Applying a small amount of silicone-based lubricant to moving parts, such as hinges or joints, can also reduce noise. Regularly inspect the frame for wear and tear, and adjust as needed to maintain stability and silence.
6.3 Slat Damage or Warping
Slat damage or warping can compromise the structural integrity of the bed frame. To prevent this, ensure slats are evenly spaced and properly aligned during assembly. Avoid exposing the slats to excessive moisture, as this can cause warping. Inspect slats regularly for signs of wear or damage, and replace any compromised ones promptly. Use only the slats provided with the Oikiture bed frame, as substitutions may not fit correctly and could lead to uneven weight distribution and further damage.

Customization Ideas
Personalize your Oikiture bed frame by adding decorative handles, painting, or staining to match your interior style. Incorporate lighting or fabric for a unique aesthetic touch.
7.1 Painting or Staining
Painting or staining your Oikiture bed frame allows for a personalized touch. Start by sanding the surface to ensure proper adhesion. Apply a primer if using paint for a smooth finish. Choose colors or stains that match your room’s aesthetic. For a natural look, opt for wood stains, or use vibrant paints for a bold statement. Allow the finish to dry completely before reassembling. This customization enhances durability and style, making your bed frame truly unique.

7.2 Adding Decorative Handles
Enhance the functionality and style of your Oikiture bed frame by adding decorative handles. Install them on drawers, storage compartments, or the headboard for a polished look. Choose materials like metal, wood, or crystal to match your bedroom’s decor. Ensure handles are securely fastened using screws or adhesive backing. This addition not only provides a elegant touch but also improves usability, making it easier to open or close compartments. Handles can be swapped or upgraded to refresh the bed frame’s appearance over time.
7.3 Incorporating Lighting
Incorporate lighting to enhance both functionality and aesthetics of your Oikiture bed frame. Install LED strips or fairy lights beneath the frame for a modern glow. Add reading lights or sconces to the headboard for convenience. Use USB-powered lights for easy installation. Ensure wires are neatly concealed to maintain a clean look. Lighting can create a cozy ambiance and make the bed frame a focal point in your bedroom. Experiment with dimmable options for adjustable brightness, perfect for relaxation or reading.

7.4 Enhancing the Headboard
Enhance the headboard of your Oikiture bed frame for a personalized touch. Add upholstery or padding for comfort and style. Attach decorative panels or decals for a unique look. Incorporate built-in shelves or storage compartments for added functionality. Install lighting strips or USB ports for modern convenience. Use fabric covers or stickers to match your bedroom decor. Consider adding storage compartments with dividers for organization. These modifications can elevate the headboard’s aesthetic and practical value, making it a focal point of your room.
Safety Considerations
Ensure the floor is clear to prevent tripping. Use proper lifting techniques to avoid injury. Secure the bed frame firmly to prevent tipping or instability.
8.1 Protecting the Floor
Protecting the floor during assembly is essential to prevent scratches or damage. Use protective covers or felt pads under the bed frame’s legs or slats. Ensure the floor is clean and dry before placing the frame. Avoid dragging heavy components, as this can cause marks or scratches. Consider using a soft cloth or cardboard to shield the floor during assembly. Regularly check for any rough edges on the frame that might damage the floor. Proper placement and protection ensure a safe and stable setup.
8.2 Safe Lifting Techniques
When assembling the Oikiture bed frame, always use proper lifting techniques to avoid injury. Bend at the knees, keep your back straight, and lift with your leg muscles instead of your back. Ensure the load is balanced and close to your body. Avoid twisting while lifting, and check the weight distribution before moving components.
For heavier parts, consider enlisting a second person to assist. Use a firm grip and take breaks if needed, especially for complex or bulky sections. Proper lifting practices minimize strain and prevent potential injuries, ensuring a safe assembly process.

8.3 Securing the Bed Frame
To ensure the Oikiture bed frame remains stable, use wall brackets or anti-tip brackets provided in the hardware kit. These prevent the bed from tipping over, especially in homes with children or pets. Always follow the manufacturer’s instructions for bracket installation. Additionally, double-check that all bolts and screws are tightened firmly to avoid any movement or wobbling during use.
Place the bed on a level floor to maintain even balance. If the floor is uneven, use adjustable feet or pads to stabilize the frame. Regularly inspect the bed frame’s connections to ensure long-term durability and safety.
Completing the Oikiture bed frame assembly is rewarding and straightforward with proper tools and instructions. Ensure all parts are securely fastened for stability and safety. Enjoy your sturdy new bed!
9.1 Final Check and Inspection
After completing the assembly, perform a thorough inspection to ensure all components are securely fastened. Check that slats are properly aligned, storage boxes are securely attached, and the headboard is firmly connected. Verify that no screws are loose and all parts are correctly positioned. Gently rock the bed to test stability and ensure no wobbling. Finally, double-check that all safety precautions, like anti-slip pads, are in place. Your Oikiture bed frame is now ready for use!
9.2 Maintenance Tips
Regularly dust and vacuum the bed frame to prevent dust buildup. Check screws and bolts periodically to ensure they remain tightly secured. Inspect the slats for any signs of damage or warping and replace them if necessary. Avoid using harsh chemicals on the finish; instead, clean with a soft cloth and mild soap. For storage boxes, ensure they are not overloaded to maintain structural integrity. Address any creaks or instability promptly to prevent further issues.
Related Posts

have auto licence want manual
Dreaming of driving a manual car? Hanif & Associates guides you through the process of changing from an automatic to a manual license in Australia. Learn how & get on the road!
clipsal single light switch wiring diagram pdf
Struggling with your Clipsal single light switch wiring? Download our easy-to-follow PDF diagram and get your lights working in no time! Australia focused.